Within our engineering team, we build, test and deploy mobile, web and embedded applications targeting a wide variety of platforms and to do so we primarly use Jenkins for continuous integration and deployment. While Jenkins may not always be the prettiest or most user-friendly tool out there, it's extremely flexible and thanks to the huge open source community behind the project there are very few configurations that cannot be supported out of the box. Plus there's also an extensive API should the need arise to create custom plugins or tool integrations.
The recent Jenkins 2.0 release brings some interesting new features but the one we're most excited about is delivery pipelines and an extensible Groovy-based Domain Specific Language (DSL) which enables us to model a "pipeline as code" by versioning a Jenkinsfile along with our source. However, pipelines in Jenkins are not a new concept, they've been around for a year or two under the name of workflows but with the 2.0 release this functionality becomes part of the key offering and it very much feels like this will be the future of how we manage builds in Jenkins.
In the following sections, we'll create a very simple Jenkinsfile which will clone from a Git repository, execute a Gradle build, capture some reports then deploy the new application to AWS using Boxfuse.
Build Executor Allocation
The first thing we need to do is request a build executor. Here as an example, we query the labels configured on our build nodes to target a Linux machine with JDK8 but in practice a Java build can execute just about anywhere. It's also worth noting that we can use multiple build executors in a pipeline allowing different stages to be isolated from one another or executed concurrently.
node("linux && jdk8") {
	...
}
Pipeline Stages
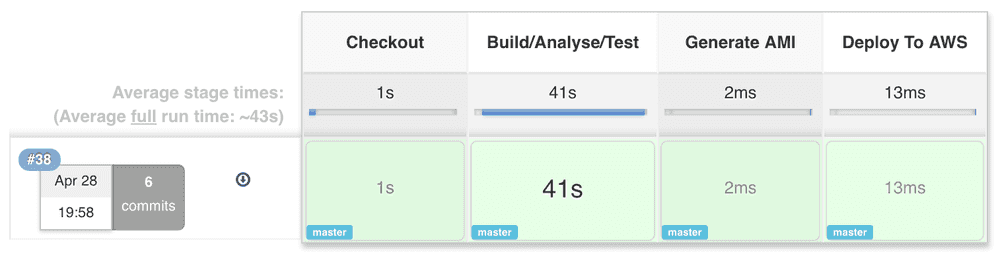
Before we move on to the build and deploy process, it's useful to explain the concept of stages in a pipeline. By default, multiple pipeline builds can execute concurrently but stages allow us to have finer grained control over concurrency by limiting concurrent access to certain sections of the pipeline e.g. a deployment phase. Stages also allow Jenkins to better visualise our pipeline like below.
Checkout
Before we build anything, we're first going to need access to source code so here we signal the start of a new pipeline stage and checkout the latest source code using Git.
stage "Checkout"
git url: "https://github.com/instil/jenkins-pipeline-dsl-plugin"
Build and Test
Next up, we have the build, test and static analysis stage. We're big fans of the Gradle Wrapper as it allows for easily repeatable builds by defining our build tool versions in source control while making automated builds trivial. After we've successfully completed the Gradle build we'd usually employ some post build actions to archive test results, reports, artifacts, etc. Unfortunately this part of the DSL still feels a bit immature in that we need to refer to specific Java classes which correspond to the post build actions we're interested in but thankfully Jenkins provides a snippet generator in the user interface which helps to generate this code and since the Jenkinsfile is simply a Groovy script, we can extract some helper functions to wrap these calls making the overal pipeline script a bit more readable. Another problem is that not all post build actions support the pipeline style of project just yet but there are plans to ensure support for the most popular plugins which are currently being tracked here.
stage "Build/Analyse/Test"
sh "./gradlew clean build"
step([$class: "JUnitResultArchiver", testResults: "build/**/TEST-*.xml"])
step([$class: "CheckStylePublisher",
      canComputeNew: false,
      defaultEncoding: "",
      healthy: "",
      pattern: "build/reports/checkstyle/main.xml",
      unHealthy: ""])
We've also been experimenting with providing some DSL extensions which are currently available from GitHub as a Jenkins plugin but note that this is pre-release software and extremely likely to change over the next couple of months as we approach a 1.0 release.
Deploying to AWS
Boxfuse makes it really simple to deploy to AWS so we're going to combine two stages here for brevity. First we use the Boxfuse Gradle plugin to generate an immutable Amazon Machine Image then perform an automated blue-green deployment. Here we also see an exmaple of how we limit concurrency to ensure that only one build can be deploying to AWS at a time.
stage "Generate AMI"
sh "./gradlew boxfuseFuse"

stage name: "Deploy to AWS", concurrency: 1
sh "./gradlew boxfuseRun"
Putting It All Together
If you compare the Jenkinsfile below with a standard freestyle job configuration, it quickly becomes apparent how much simpler this method can be while still maintaining the power and flexibility that we've come to expect from Jenkins.
node("linux && jdk8") {
    stage "Checkout"
    git url: "https://github.com/instil/jenkins-pipeline-dsl-plugin"

    stage "Build/Analyse/Test"
    sh "./gradlew clean build"
    archiveUnitTestResults()
    archiveCheckstyleResults()

    stage "Generate AMI"
    sh "./gradlew boxfuseFuse"

    stage name: "Deploy to AWS", concurrency: 1
    sh "./gradlew boxfuseRun"
}

def archiveUnitTestResults() {
    step([$class: "JUnitResultArchiver", testResults: "build/**/TEST-*.xml"])
}

def archiveCheckstyleResults() {
    step([$class: "CheckStylePublisher",
          canComputeNew: false,
          defaultEncoding: "",
          healthy: "",
          pattern: "build/reports/checkstyle/main.xml",
          unHealthy: ""])
}