
Hey Siri, How Do I Use App Intents?

When developing native apps, one of the primary goals should always be to ensure that your app seamlessly integrates with the device. Your app should feel like it is part of the OS. On iOS, there are numerous ways to achieve this, ranging from adhering to the Human Interface Guidelines to utilising the power of SwiftUI. One specific way of integrating with the device is through the use of App Intents.
App Intents allow you to extend your app’s custom functionality to support system-level services like Siri, Spotlight, the Shortcuts app, and the Action button
With rumoured Siri improvements at WWDC24 there may not be a better time than now to expose your app’s functionality to the beloved voice assistant!
In this post we will cover:
- How to create app intents
- How to expose them to Siri through app shortcuts
- Limitations of the App Intents framework and things to look out for
'App Intents' requires a minimum deployment target of iOS 16 and is designed with SwiftUI in mind. Have a look at SiriKit custom intents if you want to integrate Siri with an app that must support older versions of iOS.
App Intents Introduction
The Apple team has done an excellent job with this framework. With App Intents you do not require any additional plugins and your code serves as the source of truth for your actions. As a result, they are quick and easy to build. The incredible usage of Swift language features (such as protocols and result builders) make them simple to understand and as a result easy to maintain and iterate on just like the rest of your SwiftUI code.
For the sake of this demo, we will be implementing a WWDC Wishlist app that allows us to create a log of our burning desires for the upcoming event. The code for this blog can be found on Github.
Simple Example
Let’s begin with a simple example to get to grips with the API. For this one we want to be able to say “Hey Siri, create a new wish in WWDC Wishlist“.
To begin, let’s define our intent. As you can see below we have to create a struct that conforms to the AppIntent protocol. The static varsare self explanatory and as you can see we have to implement a perform function.
struct NewWishIntent: AppIntent {
    static var title: LocalizedStringResource = "Create New WWDC Wish"
    static var openAppWhenRun = true

    func perform() async throws -> some IntentResult & ProvidesDialog {
        // Implementation here
    }
}
Perform must return an IntentResult. In this example we use ProvidesDialog. This will most likely be the type of IntentResult that you utilise the most. The dialog will use the text you give it in a context-aware fashion. For example, when the intent is triggered via Siri, the dialog will be spoken. Alternatively, when the intent is triggered by a shortcut in spotlight the dialog will be displayed.
In the code for this intent you will see usage of the SwiftUI Programmatic Navigation which was also released as part of iOS 16.
func perform() async throws -> some IntentResult & ProvidesDialog {
    guard let navigationCoordinator = AppNavigationCoordinator.activeCoordinator else {
        throw IntentError.coordinatorNotFound
    }
    guard let sheetCoordinator = AppSheetCoordinator.activeCoordinator else {
        throw IntentError.coordinatorNotFound
    }

    navigationCoordinator.clear()
    sheetCoordinator.activeSheet = .newWishlistItem

    return .result(dialog: "Creating New Wish")
}
As you can see, the code here is pretty simple. We utilise our coordinators which are created in the view and act as singletons. We use these to control the state of our app in the perform function.
You’ll also notice the errors thrown. The enum defining your errors must conform to CustomLocalizedStringResourceConvertible. The implementation of localizedStringResource will then be used for the provided dialog.
Now that we have created the intent we must define our app shortcut in order to automatically allow the user to invoke it via Siri.
class AppShortcuts: AppShortcutsProvider {
    static var appShortcuts: [AppShortcut] {
        AppShortcut(
            intent: NewWishIntent(),
            phrases: [
                "create new wish in \(.applicationName)",
                "using \(.applicationName) create a new wish"
            ],
            shortTitle: "Create Wishlist Item",
            systemImageName: "sparkles"
        )
    }
}
The phrases are what Siri is trained to listen for to utilise the intent. Each phrase must contain your app name. The app phrases will also recognise any app synonyms you create in place of the application name. Close matches for phrases are also recognised but the tool that was released as part of the initial build of Xcode 15 for testing this has been removed in recent builds.

Examples With Parameters
Most intents you create will require some parameters. There are 3 main types that we will look at in this blog. These are:
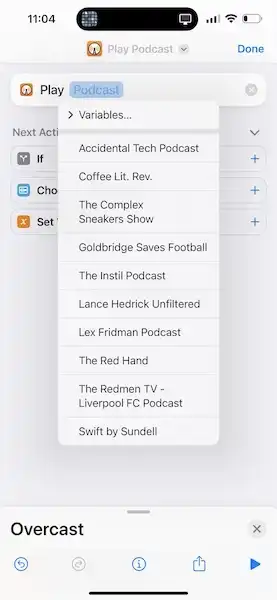
- App Entities. App entities (and queries) are used to expose your app’s dynamic data to the system level services. An example of this would be a podcast in your favourite podcasting app. The image below shows how these app entities appear in the shortcuts app. Siri will also utilise the title of these in your phrase as we will see later.
- App Enums. App enums are enums that you can modify slightly to make them compatible with intent parameters.
- Primitive Values. You can use numbers or strings as intent parameters. However, there are some limitations with these that we will discuss later.
App Entity Example
In this example we will implement “Hey Siri, open in Wishlist“
First we have to create our entity:
struct WishEntity: AppEntity {
    static var typeDisplayRepresentation: TypeDisplayRepresentation = "Wishlist Item"

    static var defaultQuery = WishEntityQuery()

    let id: UUID

    @Property(title: "Wishlist Item Title")
    var title: String

    var displayRepresentation: DisplayRepresentation {
        DisplayRepresentation(
            title: "\(title)"
        )
    }

    init(swiftDataModel: WishlistItem) {
        self.id = swiftDataModel.id
        self.title = swiftDataModel.title
    }
}
Let’s break this code down.
Create a struct that conforms to AppEntity
- Implement
typeDisplayRepresentation. This is used in the shortcuts parameter summary which we will implement as part of our intent

- Provide a default query, we will discuss the implementation of this below.
- Add a display representation for the entity instance, the title of this is what is used for the Siri phrase parameter
- Implement
- Add any properties you require in the display representation. For now we just need the wish list item title
- I’ve implemented an initialiser to map my swift data type to the app entity
Next, we have to implement the query mentioned above. For this demo I have used SwiftData but the same approach applies for an app built using CoreData or Realm.
struct WishEntityQuery: EntityQuery {
    func entities(for identifiers: [WishEntity.ID]) async throws -> [WishEntity] {
        let modelContext = ModelContext.getContextForAppIntents()
        let fetchDescriptor = FetchDescriptor>(
            predicate: #Predicate { identifiers.contains($0.id) }
        )

        return try modelContext
            .fetch(fetchDescriptor)
            .map(WishEntity.init)
    }


    func suggestedEntities() async throws -> [WishEntity] {
        let modelContext = ModelContext.getContextForAppIntents()
        let fetchDescriptor = FetchDescriptor()

        return try modelContext
            .fetch(fetchDescriptor)
            .map(WishEntity.init)
    }
}
This is a most basic implementation of EntityQuery.
First, we must implement entities for a list of known IDs.
The system can sometimes determine which entities it needs and provide you with a list of corresponding identifiers.
Secondly, we implement suggested entities, which is the list of options that will be provided to our app shortcut. If you have many options you can implement EntityStringQuery to allow the searching of entities by string in the shortcuts app.
Next, let’s define out app shortcut. The intent for this action follows a very similar pattern to the one detailed first in this blog, you can view the code in our repo.
AppShortcut(
    intent: OpenWishIntent(),
    phrases: [
        "open \(\.$wish) using \(.applicationName)"
    ],
    shortTitle: "Open Wish",
    systemImageName: "sparkles.square.filled.on.square"
)
As you can see it is incredibly simple to add a parameter to your shortcut phrase.
There is a limit of 1000 phrases for your app. Each option of a parameter counts as a phrase, so if you had 5 phrases for a shortcut that had 10 parameter options this would take up 50 of your allocation. Keep this in mind before exposing too many parameter options through entity queries.

App Enum Example
Each wishlist item has a status represented by the enum below:
enum WislistItemStatus: Codable, CaseIterable {
    case wish
    case rumoured
    case announced
}
To use this in an app intent parameter we simply have to make it conform to the AppEnum protocol.
As you can see it follows a very similar pattern to app entities. We also have to add retroactive sendable support as this is defined in a different file from the original enum.
extension WislistItemStatus: AppEnum, @unchecked Sendable {
    static var typeDisplayRepresentation: TypeDisplayRepresentation = "Item Status"

    static var caseDisplayRepresentations: [WislistItemStatus : DisplayRepresentation] {
        [
            .announced: "Announced",
            .rumoured: "Rumoured",
            .wish: "Wish"
        ]
    }
}
Next, I tried to use this in a shortcut to update the status of an item:
struct UpdateWishStartusIntent: AppIntent {
    static var title: LocalizedStringResource = "Update WWDC Wish Status"
    static var openAppWhenRun = false

    @Parameter(title: "Wish")
    var wish: WishEntity

    @Parameter(title: "Status")
    var wishStatus: WislistItemStatus
...

AppShortcut(
    intent: UpdateWishStartusIntent(),
    phrases: [
        "mark \(\.$wish) as \(\.$wishStatus) in \(.applicationName)"
    ],
    shortTitle: "Update Status",
    systemImageName: "wand.and.stars.inverse"
)
However, this did not work. App shortcuts don’t seem to be created when there is more than one parameter in the phrase. To mitigate this we can simply remove it from the phrase and siri will prompt the user for a selection. Changing my new phrase to "update status of \(\.$wish) in \(.applicationName)" has the following result.
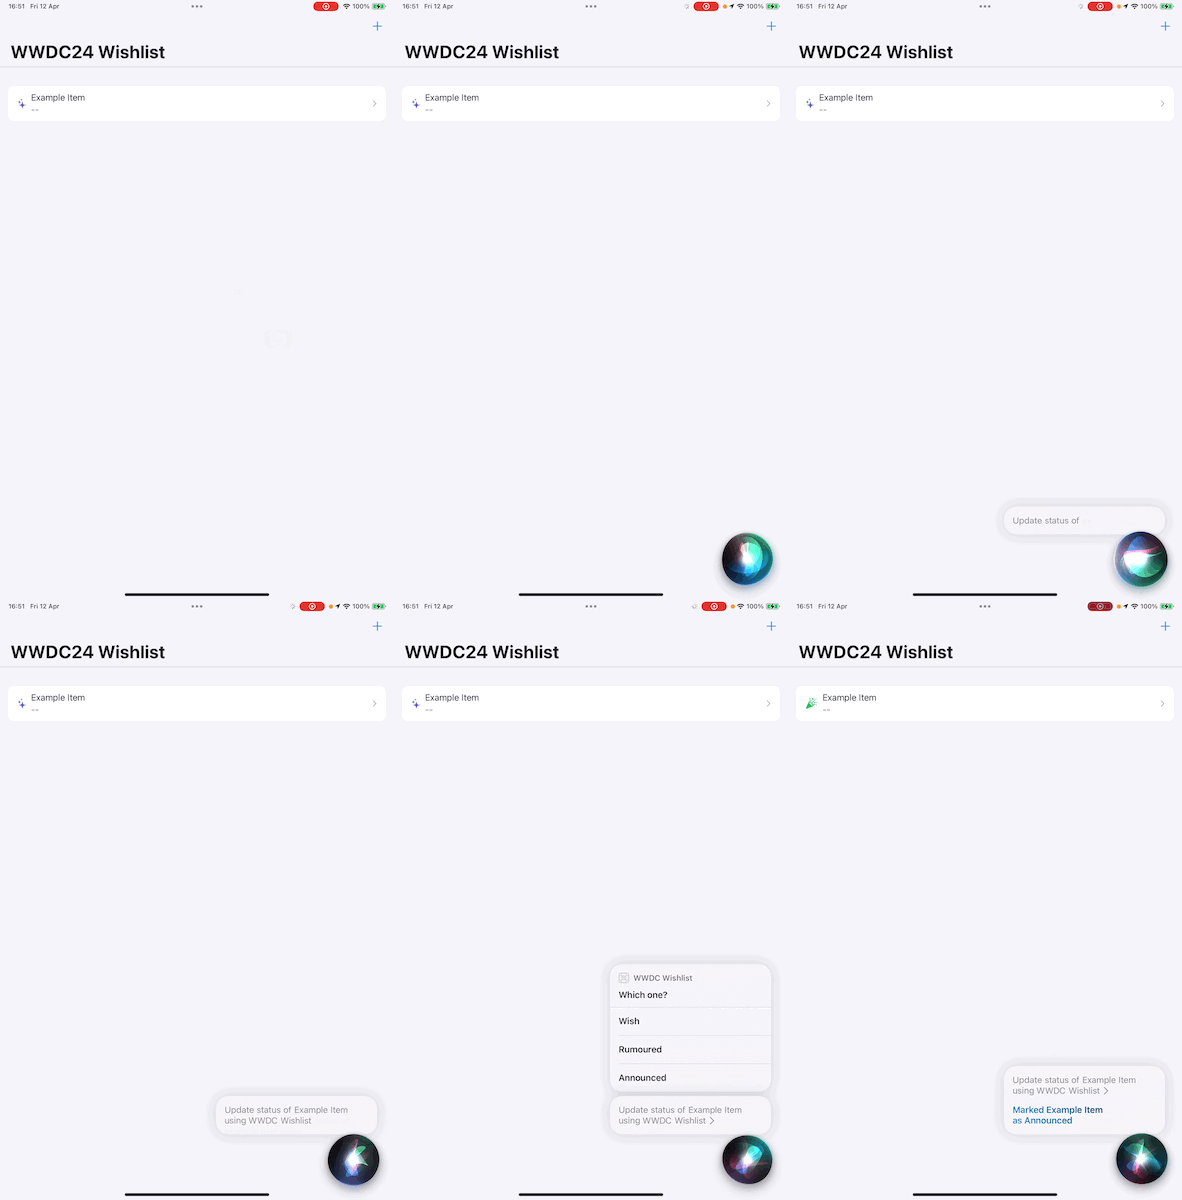
One more thing we can do is improve the result from the app intent to show a SwiftUI view instead of the text-based ProvidesDialog as follows:
func perform() async throws -> some IntentResult & ShowsSnippetView {
    ...

    return .result(view: WishlistStatusButton(
        status: self.wishStatus,
        selection: .constant(wishStatus)
    ).padding())
}
Primitive Parameter Example
As mentioned before, we can use primitive values as parameters. However, these also don’t work when included in the app shortcut phrase. This is likely a technical limitation based on the way the Siri language model is trained on device. We can treat these just as the enum above was treated and the value will be requested through a context-aware dialog.
To demonstrate this, I have added a String parameter to our initial creation intent:
@Parameter(title: "Title")
var wishTitle: String

static var parameterSummary: some ParameterSummary {
    Summary("New Wish Named \(\.$wishTitle)")
}
guard let sheetCoordinator = AppSheetCoordinator.activeCoordinator else {
throw IntentError.coordinatorNotFound
}
navigationCoordinator.clear()
sheetCoordinator.activeSheet = .newWishlistItemWith(initialTitle: self.wishTitle)
Conclusion
The App Intents framework is an excellent way to integrate your app with the system but it does not come without its limitations. The main one being the ineffectiveness of Siri as a whole. Hopefully, these phrases will become more reliable in the coming months resulting in a better experience for our users.