React Tutorial - Build a Weather App from Scratch - Part 2

Welcome back to this tutorial on using React and TypeScript to build client-side web apps. In Part 1 we covered:
- Boot-strapping an app with
create-react-app - Using React with TypeScript
- React Hooks
In this post we will complete the tutorial by:
- Integrating the Open Weather API
- Using asynchronous communication
- Applying more hooks
You can find the code on GitHub.
Step 4: Integrate Open Weather API for Search
To get real weather data we will need to talk to a service. For this tutorial we'll use the Open Weather service. The service is free but you will need to register and create a key to use the service and authenticate all API requests.
Creating a Service Interface Layer
To avoid cluttering components we will create a service interface layer to talk to the API. This could be a class or simply functions - let's use functions.
To create our service we will create a WeatherService.ts file. To add some structure to help organise our project let's create some folders:
components- contain all our componentsservices- contain all our servicesmodel- contain our model files
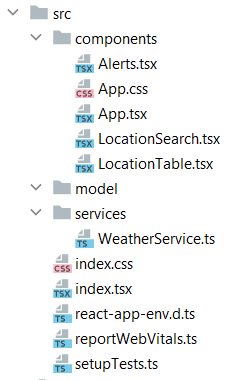
If our application grew we would create feature folders and optionally use the folder pattern above within those.
I'm not going to go into the API in detail but the format will be similar to using other services, making asynchronous fetch requests against URLs. The APIs we'll use are:
- Weather By City Name
- This will allow for searching
- We will cache the city ID and use that in the next two queries
- Weather By City Id
- Forecast By City Id
- Weather Condition Icons
All of these are simple GET requests with query parameters to specify city id and search term. The query parameters must also provide the appid you generated when registering for the free service. For example:
api.openweathermap.org/data/2.5/forecast?id=1234&appid=5678
To avoid commiting the appid in code we can read this from an environment variable at build time. This is again supported by react-scripts employing special Webpack plugins. The environment variable must begin with REACT_APP_ and can be read in from process.env. This is normally a runtime call but in this system it will be replaced by the current value at build time.
const key: string = process.env.REACT_APP_OPEN_WEATHER_API_KEY as string;
if (key === undefined) {
  throw new Error("No Open Weather API Key defined - ensure you set a variable called REACT_APP_OPEN_WEATHER_API_KEY");
}

const keyQuery = `appid=${key}`;
const server = "http://api.openweathermap.org/data/2.5";
With this initialisation code in place we can now easily build URLs for the requests e.g.
`${server}/weather?q=${term}&${keyQuery}`;Defining the Model
Since we are in TypeScript we will want to strongly type the results coming back from the API. We can model the entire object or only the parts that we want to use. Let's define a subset if the information coming back from the API in a new file model/Weather.ts.
export interface Coordinates {
  lon: number;
  lat: number;
}

export interface WeatherLocation {
  coord: Coordinates;
  id: number;
  name: string;
}
Defining Search Service Endpoint
We will need a function to search for locations by string so in WeatherService.ts add the following function:
export async function searchLocation(term: string): Promise<WeatherLocation | undefined> {
  const result = await fetch(`${server}/weather?q=${term}&${keyQuery}`);

  if (result.status === 404) return undefined;
  if (result.status !== 200) throw new Error("Failed to read location data");

  return await result.json();
}
If the search doesn't find any results we will get a 404 status code so the function returns either undefined or a WeatherLocation object which will contain the city id. This code is written using async-await which simplifies working with promises (which fetch returns).
Bringing it all Together - Search
Now that we have our model and service layer, we can start to integrate this into our components. First we can add the search. When an onSearch event fires, instead of adding the string to an array we must:
- Call our
readWeatherAPI function - Show an error if is nothing found or warning if it is already present
- This will require new state
- Add the location to the
locationsarray if found- So the type of the array must change
Let's change the type of the array and add state for an error and a warning.
const App: FC = () => {
  const [locations, setLocations] = useState<WeatherLocation[]>([]);
  const [error, setError] = useState('');
  const [warning, setWarning] = useState('');
The error and warning can then be integrated into the view:
return (
  <div className="container">
    <h1>Weather App</h1>

    <LocationSearch onSearch={addLocation} />
    {error ? <div className={`alert alert-danger`}>{error}</div> : null}
    {warning ? <div className={`alert alert-warning`}>{warning}</div> : null}
    <LocationTable locations={locations} />
  </div>
);
We can see that the two blocks are almost identical so this is a perfect opportunity to break these out as components. I'll leave this to the reader, or check out the final version to see a higher-order functional solution.
Next, let's change the addLocation handler to perform a search, resetting the error and warning beforehand.
const resetAlerts = () => {
  setError("");
  setWarning("");
};

let addLocation = async (term: string) => {
  resetAlerts();
  const location = await searchLocation(term);

  if (!location) {
    setError(`No location found called '${term}'`);
  } else if (locations.find((item) => item.id === location.id)) {
    setWarning(`Location '${term}' is already in the list.`);
  } else {
    setLocations([location, ...locations]);
  }
};
The final step is to adjust the LocationTable to use WeatherLocation objects instead of strings.
interface LocationTableProps {
  locations: WeatherLocation[];
}

export const LocationTable: FC<LocationTableProps> = ({locations}) => (
  <div>
    ...
    <tbody>
      {locations.map((location) => (
        <tr>
          <td>{location.name}</td>
        </tr>
      ))}
    </tbody>
    ...
  </div>
);
If everything has working the app should now be able to search for locations and show errors.
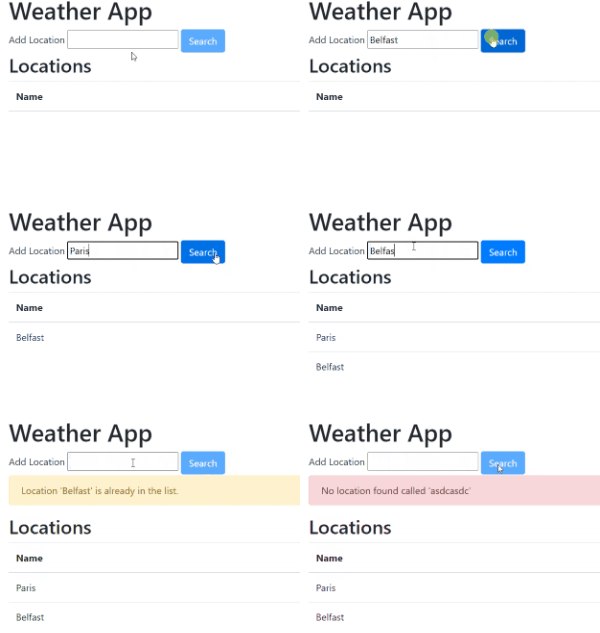
We could of course go further and disable controls and show spinners while working.
Step 5 - Showing the Current Weather
Adding a Current Location
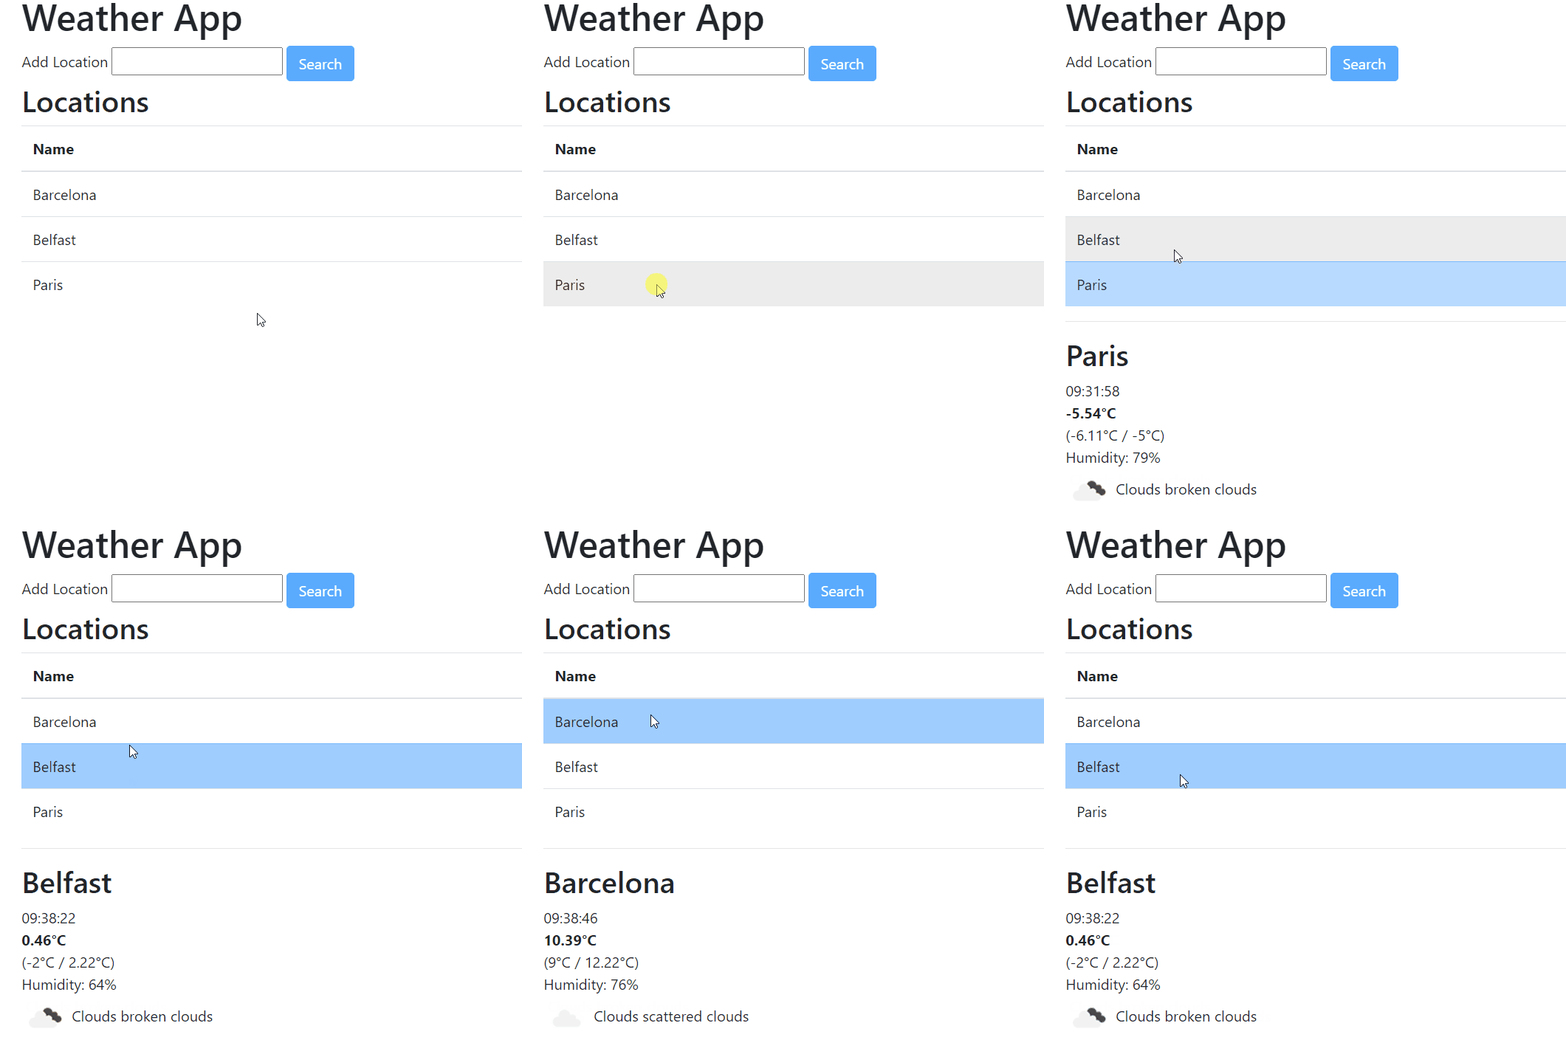
We need to have some state at the top level to represent the 'current' location. This should be highlighted in the table and the user should be able to select it from the table of locations.
This means we'll need to have the current location state in App and pass this down into the table. The table should also notify App via a callback if the selected row changes.
const App: FC = () => {
  const [currentLocation, setCurrentLocation] = useState<WeatherLocation | null>(null);
  ...
  return (
    ...
      <LocationTable locations={locations}
                     current={currentLocation}
                     onSelect={location => setCurrentLocation(location)}/>
Then in the LocationTable component we must:
- Add these new props
- Destructure them in the components parameters
- Wire up highlighting formatting based on the
currentprop - Wire up
clickhandlers on the rows to fire anonSelectcallback with the correct location.
import React, {FC} from "react";
import {WeatherLocation} from "../model/Weather";

interface LocationTableProps {
  locations: WeatherLocation[];
  current: WeatherLocation | null;
  onSelect: (location: WeatherLocation) => void;
}

export const LocationTable: FC<LocationTableProps> = ({locations, onSelect, current}) =>
    ...
    <tbody>
    {locations.map(location =>
      <tr className={current?.id === location.id ? 'table-primary' : ''}
          onClick={() => onSelect(location)}>
        <td>{location.name}</td>
      </tr>
    )}
    </tbody>
    ...
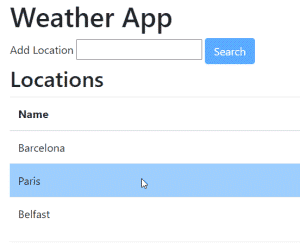
Now we have a table where we can select the current location.
Extending the Model and Service
Showing the current weather will involve similar steps as search:
- Extend model for new Weather objects
- Add a new service function to get the weather for a location
Once again we'll use a simplified model of what Open Weather is providing. We could reshape the data into nicer objects but we'll consume the data as is and simply only define/type the bits we're using.
export interface WeatherConditions {
  id: number;
  main: string;
  description: string;
  icon: string;
}

export interface MainWeatherData {
  temp: number;
  feels_like: number;
  temp_min: number;
  temp_max: number;
  pressure: number;
  humidity: number;
}

export interface Weather {
  weather: WeatherConditions[];
  main: MainWeatherData;
  dt: number;
}
Next, we'll add a function to read the current weather at a specified location.
export async function readWeather(locationId: number): Promise<Weather> {
  const current = await fetch(`${server}/weather?id=${locationId}&${keyQuery}&units=metric`);

  if (current.status !== 200) throw new Error("Failed to read location data");

  return await current.json();
}
Finally, we can make a helper function to generate icon URLs.
export function getIconUrl(code: string): string {
  return `http://openweathermap.org/img/wn/${code}.png`;
}
Creating a Single Weather Entry Component
Now let's create a component to render information about a weather object which will be passed in via props. This is using a little bit of foresight as we will instantiate this many times for our forecast.
Create a components/WeatherEntry.tsx file and add the following code:
import React, {FC} from "react";
import {Weather} from "../model/Weather";
import {getIconUrl} from "../services/WeatherService";

interface WeatherEntryProps {
  weather: Weather;
}

function convertUnixTimeToDate(unixUtc: number): Date {
  return new Date(unixUtc * 1000);
}

export const WeatherEntry: FC<WeatherEntryProps> = ({weather}) => (
  <div>
    <div>{convertUnixTimeToDate(weather.dt).toLocaleTimeString()}</div>
    <div>
      <strong>{weather.main.temp}°C</strong>
      <div>
        ({weather.main.temp_min}°C / {weather.main.temp_max}°C)
      </div>
    </div>
    <div>Humidity: {weather.main.humidity}%</div>
    {weather.weather.map((condition) => (
      <div key={condition.id}>
        <img
          src={getIconUrl(condition.icon)}
          alt={condition.main}
        />{" "}
        {condition.main} {condition.description}
      </div>
    ))}
  </div>
);
We're simply choosing some of our properties and laying them out as we would with HTML. To display the timestamp we convert from the Unix number to a Date object. We could move the convertUnixTimeToDate function out to a helpful utility file.
Creating a Weather Summary Component
Next let's create a components/WeatherSummary.tsx component that will be given a possibly null location and it will read the weather information about that location and display it using the previous WeatherEntry component.
So this component is going to have to do some asynchronous work. It will render before it has the data it needs and when the asynchronous work completes the data will be present. To do asynchronous work we need to utilise the useEffect hook.
A simplified form of this hook is:
useEffect(action, dependencies);The action is a function that will perform some side effect of the render. Typically this will eventually update some piece of state. The dependencies parameter controls when the action is re-executed. Realise that the useEffect line is executed on every component render (as its really just a normal function call) but it will not necessarily call the action on every render. The dependency parameter controls when it chooses to call the action. In this variant we will pass in an array of data that will cause the action to be re-executed if the data changes between renders.
These dependencies are any data that the action uses. So in our case the action is reading the weather for a location so the dependency array contains the location.
interface WeatherSummaryProps {
  location: WeatherLocation | null;
}

export const WeatherSummary: FC<WeatherSummaryProps> = ({location}) => {
  const [weather, setWeather] = useState<Weather | null>(null);

  useEffect(() => {
    if (location) {
      readWeather(location.id).then(weather => setWeather(weather));
    }
  }, [location]);
  ...
};
Notice how, when the readWeather completes, we set the weather state. Also note that we're not using async/await - this is due to the way useEffect expects an action that either returns a cleanup function or returns nothing. All async functions return Promises so they can't be used directly for the action parameter.
The rest of the component renders based on the state of data:
export const WeatherSummary: FC<WeatherSummaryProps> = ({location}) => {
  const [weather, setWeather] = useState<Weather | null>(null);
  ...
  if (!location || !weather) return null;

  return (
    <div>
      <hr/>
      <h2>{location.name}</h2>
      <WeatherEntry weather={weather}/>
    </div>
  );
};
Returning null simply causes the component not to render while the location or the weather are null. Note how the rendering section of the component is always synchronous - render based upon the current values of the state and props. Separate from this are the side effects which affect the render indirectly by setting state which triggers a rerender with now updated values.
Finally, we can use this at the top level in App.tsx:
const App: FC = () => {
  ...
  return (
    <div className="container">
      ...
      <WeatherSummary location={currentLocation}/>
    </div>
  );
};
Step 6 - Adding a Forecast
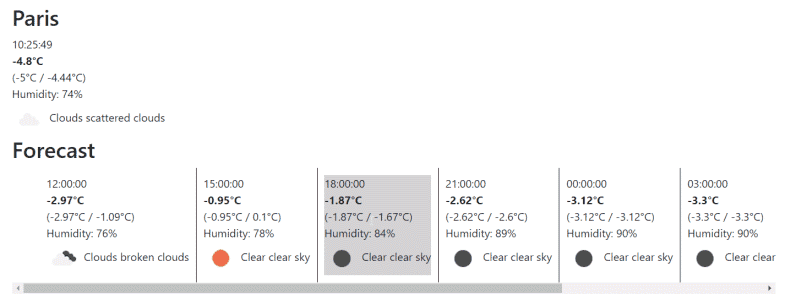
For our final step we can reuse our WeatherEntry component to show a list of weather forecasts.
Extending the Service
We need a new function in the service layer to read the forecast. This is similar to readWeather but we're returning 8 forecasts on 3 hour intervals to give us a 24 hour forecast. The data returned has an inner list property which is what we return.
export async function readForecast(locationId: number): Promise<Weather[]> {
  const forecast = await fetch(`${server}/forecast?id=${locationId}&${keyQuery}&units=metric&cnt=8`);

  if (forecast.status !== 200) throw new Error("Failed to read location data");

  return (await forecast.json()).list;
}
Extending the Summary
Now we can extend the summary component to read in the forecast in the same effect as the read weather. We can use a Promise.all call to execute the two requests at the same time. We'll also use an inner function so that we can use async await without making the useEffect action itself async.
export const WeatherSummary: FC<WeatherSummaryProps> = ({location}) => {
  const [weather, setWeather] = useState<Weather | null>(null);
  const [forecast, setForecast] = useState<Weather[] | null>(null);

  useEffect(() => {
    (async function () {
      if (location) {
        const [weather, forecast] = await Promise.all([
          readWeather(location.id),
          readForecast(location.id)
        ]);
        setWeather(weather);
        setForecast(forecast);
      }
    })();
  }, [location]);
  ...
Now that we've defined our state and populated it, we can build up the view.
export const WeatherSummary: FC<WeatherSummaryProps> = ({location}) => {
  ...
  if (!location || !weather || !forecast) return null;

  return (
    <div>
      <hr/>
      <h2>{location.name}</h2>
      <WeatherEntry weather={weather}/>

      <h2>Forecast</h2>
      <div>
        <ol>
          {forecast.map(timePoint =>
            <li key={timePoint.dt}>
              <WeatherEntry weather={timePoint}/>
            </li>
          )}
        </ol>
      </div>
    </div>
  );
};
Note that the null check is doing more than simply controlling visibility.
if (!location || !weather || !forecast) return null;location, weather and forecast are all nullable, which means TypeScript will not let us simply use them. For example, location.name or forecast.map would fail if location or forecast was null. But in this if check we return if they are null so in any code that follows TypeScript understands they cannot be null so the type automatically changes without a cast/type assertion. For example, forecast changes from Weather[] | null to simply Weather[]. This is an example of a Type Guard and is awesome! We get the safety without having to add more code than we would in plain JavaScript.
Styling
We have our forecast but it doesn't look great as a vertical list. We should now add some basic styling. Add a components/WeatherSummary.scss file with the following content:
ol {
  overflow: auto;

  li {
    border-right: 1px solid black;
    padding: 10px;
    list-style-type: none;
    display: inline-block;

    &:hover {
      background: lightgray;
    }
  }
}
To support SCSS we need to add the node-sass package to our project and restart the development server. I'm using version 4.14 as there were incompatible packages with version 5.
npm install --save node-sass@4.14.1
npm start
We can now import this within WeatherSummary.tsx:
import "./WeatherSummary.scss";It's important to understand that, although we can add any number of CSS (or other) style files in this way, any styles we define will be global. Even if they are imported within individual components. Contrast this with something like Angular which encapsulates styles per component by default.
Another option for styling is to add some inline styles using objects. The naming is camel-case which differs from pure CSS.
<ol style={({whiteSpace: 'nowrap'})}>There are other options such as CSS modules or styled-components. We cover these in our course, come and check it out.
Wrap Up
I hope you enjoyed that. If you've followed along you've gained a good introduction to using React to build single page applications.
There's obviously more we could do here. In our full React course you'll learn everything we've seen in greater detail and lots more advanced topics:
- Using JavaScript or TypeScript
- Redux
- Hooks vs Classes
- Advanced Styling
- Routing
- Lazy Loading
- Testing
- and more
Since we write and deliver all our own material we're happy to customise each delivery to a team's particular requirements and experience level. Check out our many other courses and see if we can create a bespoke delivery for you and your team.